
The No Access Sticker works a little differently than other stickers, let's go through how and why!
Permission Level: Owner | Manager | ID Manager
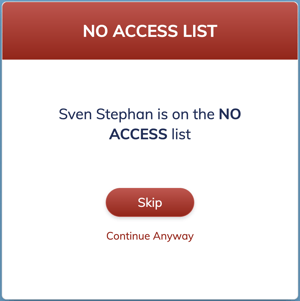
What makes this sticker different? When you check someone into an event, you will get an alert pop-up to make it very clear that they are on the No Access List. At the discretion of the ID manager checking them in, click Skip to deny access or choose Continue Anyway to allow access and check them in.
Video Example:
The No Access Sticker is automatically added to your Minga and cannot be edited, inactivated or deleted. However, you can edit the icon if you wish to customize it. It can be added to an ID the same way as any other sticker.
Video Tutorial:
Step by Step:
- When logged into Minga, select the ID Manager and navigate to the Stickers tab
- Click the
 icon to Add Members
 - If you wish to add an individual member type their name, email or student ID number in the search field. You can also filter by Group, Grade, and Role if you wish to add it to more than one member.
- Check off all desired members and hit Add
If you wish to add multiple users to a membership, upload a .xlsx spreadsheet or comma separated value (.CSV) file similar to the way that you Add Multiple New Members to Your Minga From a List and hit search.