📣 If you do not see your SIS listed, reach out to support@minga.io and we can help get you set up!
Roster with Clever
Step by step:
- Approve the Minga application in Clever. Your District Admin will be responsible for this step. Click here for instructions on approving the Minga application in Clever.
-
Approve and share the Minga application by school.
-
Reach out to support@minga.io with the following:
-
The name of your district
-
The name of the school you are rostering
- The name and email address of the district contact responsible for Clever integrations
-
- Our integration specialists will then set up your school and push a manual sync to populate your students, teachers, and class rosters.
- Now you can configure your sync settings
Roster with ClassLink
Step by step:
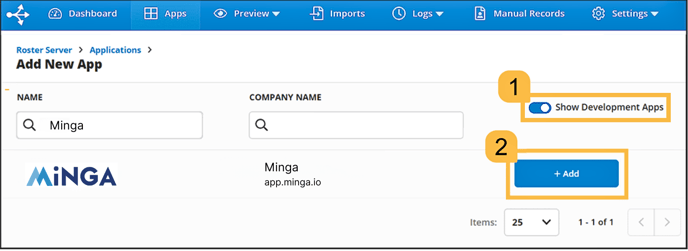
1.Add Minga as a Roster Server Application
- Click the Apps tab, then click + ADD.
- Toggle on Show Development Apps, search for Minga, then click the + Add button for the app(s) you want to add.
2. Enable Roster Server Application Permissions
- With your app(s) added, it's time to define vendor permissions. Permissions specify how much access the vendor can have to your data for app account provisioning.
- Select Full Permissions, or, alternatively, you can select Rule Based Permissions if you are comfortable with setting ClassLink permissions.
💡 Please note: With rule based permissions you will have to enable sharing Classes and Courses, Parent or Guardian info, Student ID, Grade, Name, and Email in order for Minga to work effectively.
.png?width=688&height=284&name=Minga%20(2).png)
3. Reach out to the Support Team at support@minga.io to let us know you have enabled sharing permissions. We will locate the required information in the ClassLink Partner Portal to finish setting up automatic rostering through MingaSync for your school.
Roster with PowerSchool
Step by step:
1. To set up automatic rostering with PowerSchool for your school or district, please reach out to support@minga.io to receive a connection request. Please ensure that your request contains the following information:
The name of your district
The name of the school you are rostering
The name and email address of the district IT contact who manages SIS integration
2. Complete the Connection Request sent to you by the support team, ensuring to download the PowerSchool Plugin and then enter the API Endpoint, Client ID, and Client Secret
3. Our integration specialists will then set up your school and push a manual sync to populate your students, teachers, and class rosters.
4. Configure your sync settings
Roster with Aeries
Step by Step:
1. Set up Aeries to allow Minga to connect to Aeries and access the roster information for staff and students. Setting up the Aeries OneRoster API requires Administrator access. For more information and instructions on this, please visit the Aeries Support Site.
2. Add an entry for Minga on the API Security page in the Security node in the Aeries Administrator Console. Use Minga for the Product Name and ensure to select OneRoster as the type. Further Instructions can be found in the API Security article.

3. After an entry for Minga has been created, continue to work in the Security | API Security page. First, select Minga. You will see Product Information listed as shown below.

The OneRoster URL can be changed by accessing School Options at the District level.

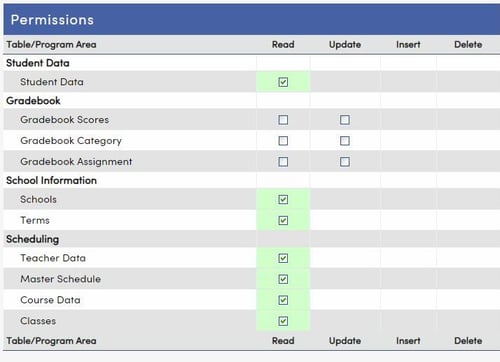
4. Enable permissions. Minga only pulls student and roster data, parent info and classes. However, you need to enable READ Permissions for Student Data, Schools, Terms, Teacher Data, Master Schedule, Course Data, and Classes for the OneRoster to Aeries integration to work.
5. Enable OneRoster for Minga. Select Change on the API Security form then ensure the OneRoster check box is checked to enable Minga to access the OneRoster API. After checking the box, click the Update button.

6. Display Consumer ID and Secret Key. After updating, check the box labeled Display Consumer ID & Secret Keys for OneRoster. Make note of the Consumer ID and Consumer Secret Key that are displayed. The core security of the OneRoster API is different from that of the regular Aeries API. For OneRoster, we will NOT use the Aeries Certificate, but will use the Consumer ID and Secret Key instead.

7. Any changes to your OneRoster Settings require a full IIS reset for the change to take effect. Resetting IIS will terminate sessions of all users who are currently logged in. It is recommended to reset IIS after working hours.
8. Reach out to support@minga.io to receive a connection request to link Aeries to Minga. Please ensure that your request contains the following information:
- The name of your district
- The name of the school you are rostering
- The name and email address of the district IT contact who manages SIS integration
9. Complete the connection request by providing API Endpoint, Client ID, and Client Secret and click Save and Done. Once this has been completed, notify Minga Support.

10. Our integration specialists will then set up your school and push a manual sync to populate your students, teachers, and class rosters
11. Configure your sync settings
Roster with Infinite Campus
Step by Step:
- Navigate to Instruction > Settings > Digital Learning Application Configuration (or System Administration > Learning Interoperability in the Classic Navigation)
- Click Add Application, scroll to the bottom, and click Connect to Other Applications
.png?width=439&height=319&name=Body%20(2).png)

5. Select OneRoster 1.1 with 0Auth 2.0 and then select Generate

6. Reach out to support@minga.io to receive a connection request. Please ensure that your request contains the following information:
- The name of your district
- The name of the school you are rostering
- The name and email address of the district IT contact who manages SIS integration
8. Complete the connection request by entering the API endpoint, client ID, client secret, and clicking Save and Done. Once this has been completed, notify Minga Support
7. Our integration specialists will then set up your school and push a manual sync to populate your students, teachers, and class rosters. Once this step has been completed, we will reach out to you through email, and you can configure your sync settings
Roster with Skyward
Skyward SMS
Step by Step:
1. Reach out to support@minga.io to receive a connection request. Please ensure that your request contains the following information:
- The name of your district
- The name of the school you are rostering
- The name and email address of the district IT contact who manages SIS integration
2. Once you have received your connection request from Minga, you will need to do the following in Skyward:
-
Go to Student Management > Administration > SkyBuild > Exports
-
Select OneRoster Export
-
Select Add to add a new template
-
Enter a Template Description (for example: “Your App OneRoster”)
-
For Export Version, select OneRoster® v1.1
-
Under Export Options, configure these settings:
-
You will need to configure a new SFTP location using the information included in the connection request you received from us.
-
Include All Entities = ON
-
Allow multiple ‘Users.csv’ records = OFF
-
Include Guardians = OFF
-
Send File via FTP = ON
-
Save File via UNC Path = OFF
-
-
Under Version Specific Options – v1.1, configure these settings:
-
Use GUIDS = OFF
-
Academic Sessions = Bulk
-
Categories = Do Not Export
-
Classes = Bulk
-
Courses = Bulk
-
Demographics = Bulk
-
Enrollments = Bulk
-
Line Items = Do Not Export
-
Orgs = Bulk
-
Results = Do Not Export
-
Users = Bulk
-
-
Save your export and click on either the Export or Print button.
-
Navigate to your Skyward Print Queue, where you should see the export processing.
-
Highlight the export and select Tasks or Scheduled Tasks on the right side.
-
Schedule your export to be delivered daily.
3. Once these steps have been completed, notify Minga Support to activate your connection to MingaSync. Once the connection is live, you can configure your settings.
Skyward Qmlativ
Step by step:
- From your Skyward Qmlativ account, click Administrative Access.
- From the left menu, click Reporting and select Report Manager.
- A set of OneRoster reports are already available from Skyward and you can find them in the list by searching 'OneRoster'. Follow the next instructions for each of these reports:
- OneRoster 1.1 - AcademicSession
- OneRoster 1.1 - Classes
- OneRoster 1.1 - Courses
- OneRoster 1.1 - Demographics
- OneRoster 1.1 - Enrollments
- OneRoster 1.1 - Orgs
- OneRoster 1.1 - Users
- Open the report and click 'Clone Report' in the top right.
- On this page:
- Rename the report to keep them organized.
Ex. "VendorName - AcademicSession" - Ensure 'Encoding Type' is set to UTF-8.
- Click Save in the top left.
- Rename the report to keep them organized.
- All required fields should already be selected, but you can add additional fields as needed in the 'Fields' section of the left side panel.
- Click 'Run Report'.
- On the next page, again click 'Run Report' at the top of the page.
- Return to the Report Manager and locate your new report. Click the arrow symbol to open the report details.
- Click 'Publish Report' then 'Save'.
- Click 'Scheduled Reports' in the left side panel and click 'Add Scheduled Report'.
- Name the scheduled report and set your desired schedule. We recommend a daily export with a Start Time after business hours.
- Click 'Save & Add Export Location'
- If you haven't created a new SFTP connection yet, click 'Add FTP/SFTP Connection'. This only needs to be done once. If you've already set up the new connection, search for it and select it in the 'File Destination' box. Again, you only need one SFTP connection for all files so set up the connection once, then simply point all the other files to the same location.
- To create a new SFTP connection, on the 'Add FTP Connection' page enter the following details. If something isn't mentioned you can leave the settings as-is.
- Name: <Vendor Name>
- Username, Password, Host, Port: Enter these details as found on the RosterStream connection request form.
- Click 'Test Connection' to confirm the Username, Password, Host, and Port are set correctly. If successful, click 'Save'.
- Select your newly created SFTP connection as the 'File Destination'.
- Make sure 'Automate File Name' is unchecked, and 'Overwrite Existing File' is checked, then add an 'Export File Name'. We recommend the standard OneRoster file names:
- academicSessions
- classes
- courses
- demographics
- enrollments
- orgs
- users
- Click 'Save', and on the follow page click 'Save' again.
- Repeat steps 4-16 for each of the other OneRoster files.