Permission Level Required: Owner | Manager
This is for adding multiple users from a list such as a spreadsheet or comma separated value (.CSV) file. To add a single user, go here.
🚨 NOTE:
If automatic rostering through your SIS is possible, we strongly recommend setting this up. With automatic rostering, all active users in your SIS will be automatically rostered into your Minga, and their profiles updated in each nightly sync. We're also able to auto-archive users who are no longer active in your SIS, revoking their access to your Minga. Click here for a helpful guide on setting up automatic rostering.
Uploading People into Minga
- Download your data from your SIS
- This data should include everyone you wish to populate your Minga for the next year, including Owners, Managers, Teachers, Staff, Students & Student Leaders
- To start, go to app.minga.io and navigate to People Manager
- Click Import list

- Drag and drop your Excel or CSV file
- Select First Row Contains Headers
- Select Archive Existing Users Not On List
This will archive and remove all users within Minga who are not included in your new list of data. This cannot be undone!
-
- Click Confirm to archive users
- Select the correct headers from drop-down
- Click arrow to view columns to the right
- Click Import List
- Review Upload Summary to see how many users have been added, updated and will be archived
- Review Archive Summary and click Review users to be archived to review CSV file of all users to be archived
- Click Archive Users
- Confirm Users to be archived
Required Data Fields for upload
In order to add multiple users from a list, you need to create a list in an Excel or CSV file with the following information:
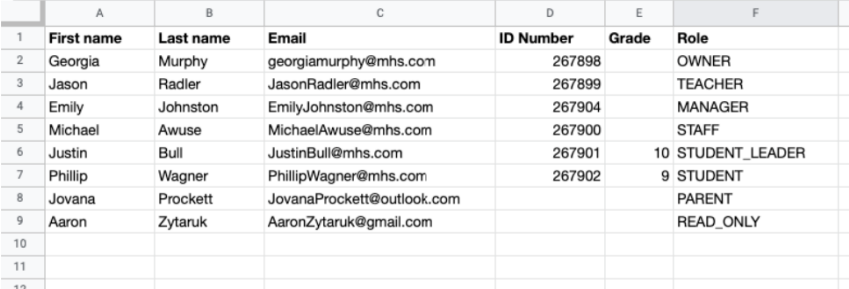
- First Name (required) - This is the user's first name
- Last Name (required) - This is the user's last name
- Email Address (required) - This is the email address the user was added to your Minga with whether it's a linked Google or Microsoft account or an address from any other email provider
- Grade (Recommended) - The grade of the user
- Student ID Number (Recommended) - This is the user's Student ID number and will be shown on the user profile and will generate a barcode on their ID Card.
- Role (Recommended) - This is the role of the user to identify if the user is an Owner, Manager, Teacher, Staff, Student Leader, Student, Parent or Read Only in Minga.
- For more information check out Roles and Permissions for Minga Members.
You will be required to set a default Role when adding a list - this will fill in the role for anyone who does not have a specified role
- Roles must be listed as follows:
- OWNER
- MANAGER
- TEACHER
- STAFF
- STUDENT_LEADER
- STUDENT
- PARENT
- READ_ONLY
- For more information check out Roles and Permissions for Minga Members.
- Display Name (optional) - This is the name that will show up in Minga for the user. By default for students and parents, it is first name + last name (e.g. John Denver). For Owners, Managers, and Teachers, it defaults to first initial + last name (e.g. J Denver)
- To input a custom display name (e.g. Mr. Denver instead of J Denver):
- Click on the pencil icon next to the user in the People Manager
- Check of the box in the Display Name field
- Type in the desired name and hit Save
- To input a custom display name (e.g. Mr. Denver instead of J Denver):
- Phone Number (optional) - This is the user's phone number