💡 You must have your behaviors setup before you can create consequences. Learn how to enable and manage behaviors here.
Enable Consequences in Minga
Step by Step:
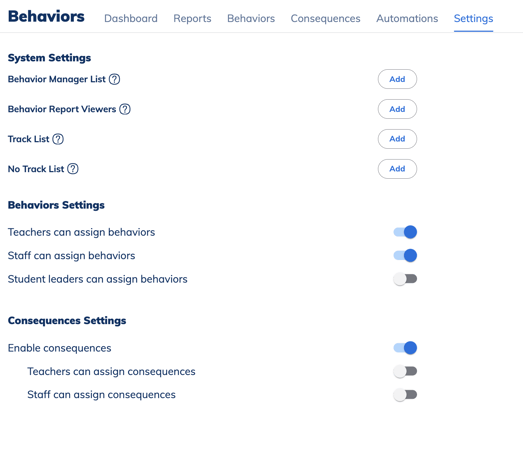
- Navigate to the Settings tab in Behaviors
- Toggle on Enable Consequences
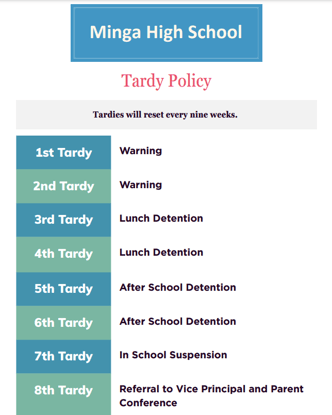
The next steps will be based on the following discipline policy:
Set Up Each Consequence in Minga
Step by Step:
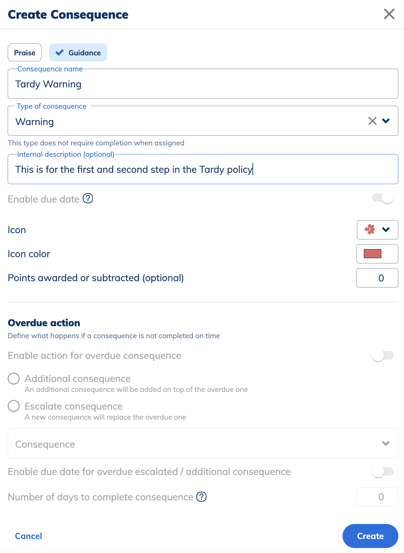
Setting up First Consequence:
- Navigate to the Consequences tab in Behaviors
- Click Create Consequence
- Create the first Consequence in your discipline policy
-
- Select "Guidance" to match your discipline policy
- Optional: Enter description (Please note* this is only for the use of describing it for your internal admin team)
- Select the Type of Consequence (This is a Warning which is not time bound. Please note, Detentions and Referrals have to be completed in Minga otherwise they will show as "Overdue" in the Consequence History report.)
- Select the desired Icon and Icon color
- Decide if you want to send parent and/or Admin notifications and toggle on and edit accordingly
- Click Create
Set Up the Remainder of the Consequences in Minga
Step by Step:
- Create the remainder of the Consequences as per your discipline policy following the steps above
- Ensure desired Consequences are toggled to Active
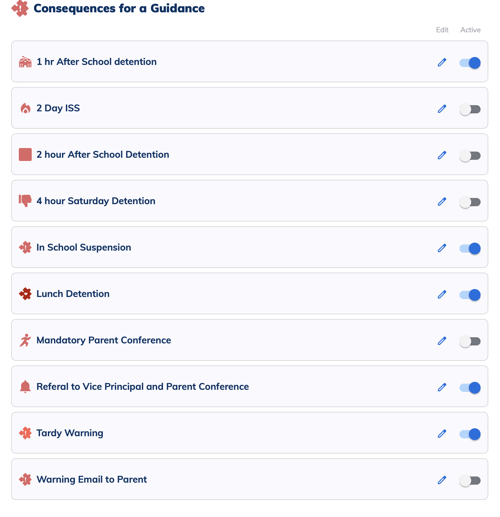
- Please note "Lunch Detentions" and "After School Detentions" will be a Detention for Type of Consequence and "In School Suspension and Referral" will be a Referral
- You can customize parent and admin notifications per Consequence
Create an Automation Group in Minga Based on Behavior Threshold
Step by Step:
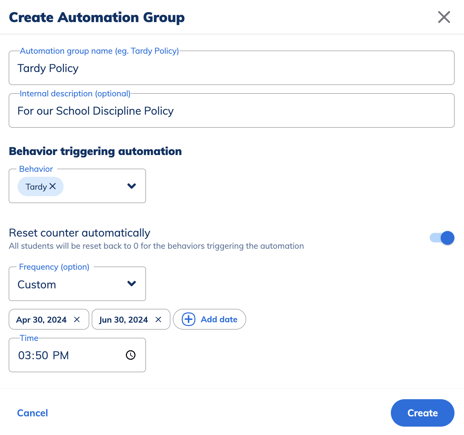
Setting the Automation Group:
- In the Automations tab in Behaviors click Create Automation
- Name the Automation Group after the progressive discipline framework. In this case, Tardy Policy
- Optional: Provide an internal description describing the policy. (Please note* this is only for the use of describing it for your internal admin team)
- Select the Behavior that will trigger the Automation in the Behavior triggering automation drop-down
- Optional: Select if you would like the behavior count to reset automatically by toggling on Reset counter automatically. Minga's best practice is to select a custom time period in line with the semester and early in the morning (12:01am) as to not interfere with operating hours
- Select Create
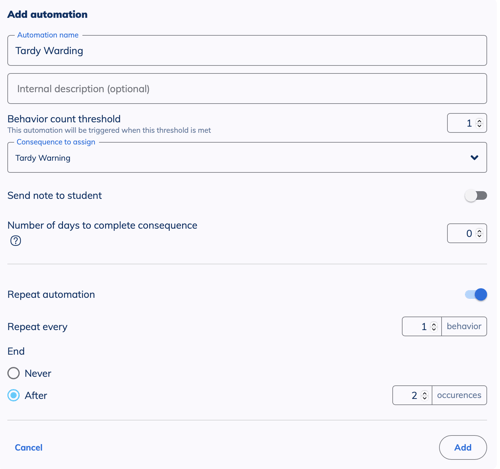
8. Now that your Automation Group has been created you can now add consequences by clicking Add Automation
9. Name the first step of the automation sequence. For our Tardy Policy, we will name this Tardy Warning, as this is the first step in our framework
10. Select the Behavior Threshold. (How many times the behavior has to occur to automatically assign the consequence). Since this is the first tardy step, we put number 1 here
11. Select the Consequence to assign in order to generate the consequence automatically
11. Select the Consequence to assign in order to generate the consequence automatically
12. Optional: To send a note to the student, set the toggle to Active
13. If the consequence needs to be completed in a time frame, choose how many days the student has to complete it
14. Toggle on Repeat automation if this step recurs in your sequence. In our tardy policy, the warning is sent in both the first and second step, so we will set this to repeat every 1 behavior ending after 2 occurrences
15. Click Add to add this automation step to your Tardy Automation Group
16. Continue in the steps outlined above for each consequence. Once complete your Tardy Policy will be complete and running automatically!

Video Tutorial:
💡 Note: If you need to reset a student or students back to a certain step in the automation framework you can do so by following these instructions: Updating Automation Counters.