Use Hall Pass Reports to see who is spending too much time in the halls or creating/assigning too many Hall Passes.
Permission Level: Owner | Manager | Teacher | Staff
Review Hall Pass Usage
You can review Hall Pass usage at any time, however, at least 3 weeks of reporting data is best to identify any problem areas. You can filter report data based on specific lists, such as class, grade, or custom groups, making generating targeted and relevant reports easier.

Step by Step:
- Navigate to the Reports tab within Hall Pass
- View the total number of passes used and the total time spent out of the classroom in the summary reports for Top Users, Top Creators and Top Hall Pass reports
- Adjust filter to search by date range, First & Last Name, ID, Email, Lists or Type
- Teachers can filter report by Class Lists to see hall pass trends in each class
.gif?width=688&height=394&name=2024-08-27_16-42-36%20(1).gif)
Identify problem areas
After 2-3 weeks of allowing free use of Hall Passes, it's time to identify any problem areas.
Step by Step:
- Navigate to the Reports tab within Hall Pass
- View the Students report in Hall Pass Reports to see which students are using the most Hall Passes
- Click the View Summary
 icon next to the student to see their total hall pass time and any trends for that time period.
 - Click the View Pass History
 icon to view all previous passes granted for the student
 - Adjust desire date range, search by Name, ID Number, List or Email, filter by Hall Pass Type, Student Created, Staff Created or All
Video Tutorial:
If you see some issues with the amount of time certain students are spending in the halls or if a certain member is giving out too many passes, Owners may wish to utilize the Restrictions tab to limit or restrict usage.
Archive or Edit a Hall Pass Made In Error
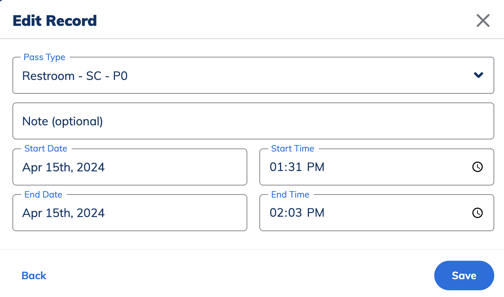
Archive or edit Hall Pass entries to correct mistakes like the wrong destination or issuance time, ensuring that Hall Pass records accurately track student movements.
Step by Step:
- Navigate to the Reports tab within Hall Pass
- Select the Hall Pass History Report
- Click the archive button next to the record you wish to archive
- OR click the edit pencil next to the history report record and adjust the hall pass type, duration, time and date as needed.


Customizing Saved Date Ranges
Monitor student behaviour and academic performance with customizable timeframes and quick-select options. Now, you can get the insights you need exactly when you need them.
You can select a specific date range or a number of days on any report and save this selection as a preset for future use.
Adding a Custom Date Range:
- Navigate to your Reports tab in the Hall Pass, Behavior, Points or FlexTime sections.

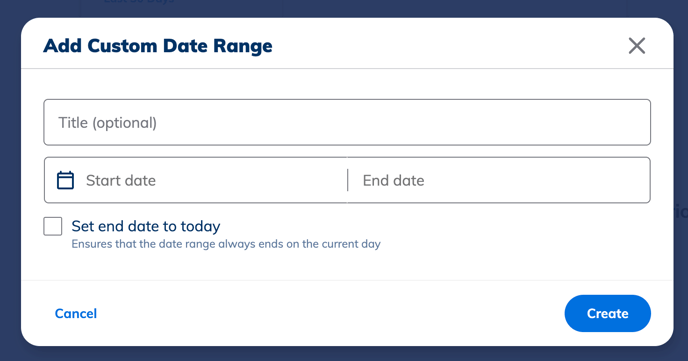
- Click on the "Date Ranges" button.
- Click the "Add Custom Date Range" modal.
- Enter the end date.
- Optionally, check "Set end date to today".
- Add a title.
- Click "Create" to confirm and apply the custom date range.

Reviewing and Editing Date Ranges on Mobile:
-
Access the date range list from the mobile app.
-
Tap on a date range entry to edit.
-
Adjust the start date, end date, or comment as required.
-
Tap "Save" to update the changes.
Hall Pass Denied Reporting
Sometimes, a student might try to create a hall pass when they’re not supposed to—like during a blackout period or if they’re in a no-party group. When this happens, the system will log the denied request so you can keep track of it.
- The denied request is recorded in the Hall Pass Reports tab under the Hall Pass History Report.
- The report includes details such as:
- Who denied the request
- The reason for the denial (e.g., blackout period, no-party group)
- The date and time of the denial

.gif?width=688&height=650&name=2024-08-27_14-02-52%20(1).gif)
Learn more about Hall Pass restrictions and reporting here.
