Uploading People into Minga
- Download your data from your SIS
- This data should include everyone you wish to populate your Minga for the next year, including Owners, Managers, Teachers, Staff, Students & Student Leaders
- To start, go to app.minga.io and navigate to People Manager
- Click Import list

- Drag and drop your Excel or CSV file
- Select First Row Contains Headers
- Select Archive Existing Users Not On List
This will archive and remove all users within Minga who are not included in your new list of data. This cannot be undone!
-
- Click Confirm to archive users
- Select the correct headers from drop-down
- Click arrow to view columns to the right
- Click Import List
- Review Upload Summary to see how many users have been added, updated and will be archived
- Review Archive Summary and click Review users to be archived to review CSV file of all users to be archived
- Click Archive Users
- Confirm Users to be archived
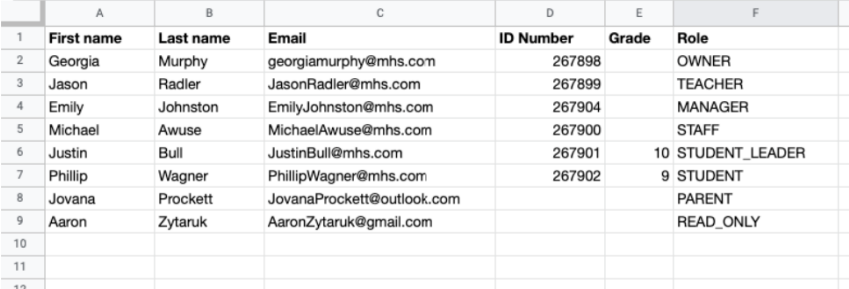
Required Data Fields for upload

- First Name (required) - This is the user's first name
- Last Name (required) - This is the user's last name
- Email Address (required) - This is the email address the user was added to your Minga with whether it's a linked Google or Microsoft account or an address from any other email provider
- Grade (Recommended) - The grade of the user
- Student ID Number (Recommended) - This is the user's Student ID number and will be shown on the user profile and will generate a barcode on their ID Card.
- Role (Recommended) - This is the role of the user to identify if the user is an Owner, Manager, Teacher, Staff, Student Leader, Student, Parent or Read Only in Minga.
- For more information check out Roles and Permissions for Minga Members.
You will be required to set a default Role when adding a list - this will fill in the role for anyone who does not have a specified role
- Roles must be listed as follows:
- OWNER
- MANAGER
- TEACHER
- STAFF
- STUDENT_LEADER
- STUDENT
- PARENT
- READ_ONLY
- For more information check out Roles and Permissions for Minga Members.
- Display Name (optional) - This is the name that will show up in Minga for the user. By default for students and parents, it is first name + last name (e.g. John Denver). For Owners, Managers, and Teachers, it defaults to first initial + last name (e.g. J Denver)
- To input a custom display name (e.g. Mr. Denver instead of J Denver):
- Click on the pencil icon next to the user in the People Manager
- Check of the box in the Display Name field
- Type in the desired name and hit Save
- To input a custom display name (e.g. Mr. Denver instead of J Denver):
- Phone Number (optional) - This is the user's phone number
Minga Notifications
When a new user is added, Minga sends an invite to that person's email address that will allow them to log in for the first time using our single sign-on.
💡 This will only work for email addresses that can receive emails from outside your school. For most schools, students cannot receive emails from Minga so we recommend Owners email students directly when they are uploaded into Minga.
View an example email template here.
In addition to inviting users to access their account through single sign-on, you can select that a PIN be emailed to the user to access their account.
This option is favourable for parents as you may not have their preferred email address on file. To use this option, make sure that the "Send PIN Emails" is selected.
