Permission Level: Owner | Manager
This article will cover updating multiple members of your Minga from a list such as a spreadsheet or comma separated value (.CSV) file. To add multiple users go here, to add a single user, go here.
Every now and then you will need to update the users of your Minga. This can be easily done as an Owner or Manager by uploading an Excel or CSV spreadsheet through People Manager by following the same process as adding multiple users.
Creating Your Update List
There are a wide variety of fields you can update for each user. When creating your spreadsheet you only need to include the columns for the fields you want to update.
Minga uses Email Address or Student Number as the unique identifiers when updating other fields. You must include one of these unique identifiers along with the data you would like to update.
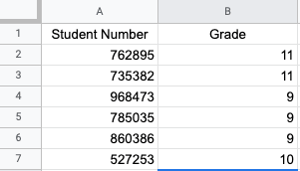
Updating all student's grade for the new school year
When updating an entire list of students with their new school grade and any other personal information that may have changed since the last upload simply download your full list from your SIS. Only Student Number and Grade need to be included but you may include additional fields and Minga will update all new information associated with the Student Number and Email Address.
You can also instruct Minga to ignore any columns in your data that it should not update.
Fields available to update
- First Name
- Last Name
- Email Address (Unique Identifier) - Cannot be updated via a list upload.
- ID Number (Unique Identifier) - This is the user's Student ID number and will be shown on the user profile
- Display Name - This is the name that will show up in Minga for the member. By default for students and parents, it is first name + last name (e.g. John Denver). For Owners, Managers, and Teachers, it defaults to first initial + last name (e.g. J Denver)
To input a custom display name (e.g. Mr. Denver instead of J Denver):
- Click on the pencil icon next to the member in the People Manager
- Check of the box in the Display Name field
- Type in desired name and hit Save - Role - This is the role of the member. For more information check out Roles and Permissions for Minga Members
- Phone Number - This is the user's phone number
- Grade - The grade of the user (Should be a number only)
- Custom ID Field 1 - A custom identification you want to appear on a Student's ID
- Custom ID Field 2 - A custom identification you want to appear on a Student's ID
- Birth date - If their birthdate is added, the member will be included in birthday greetings in your Minga on their birthday
- Phone Number - Adding a member's phone number will allow you to send their invitation to your Minga via text message
Updating Users & Archive Students & Teachers who have left
- As an Owner or Manager, once you have created your list of users go to the People Manager. This can be found on the right hand side of your desktop or in the top right menu of the mobile app
- Click Import List
- Ensure the 'What to do with people that already exist' drop down is selected as 'Update fields if they already exist'
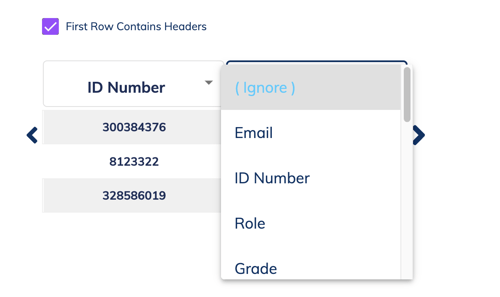
- Select the correct headers
- Select 'Archive Existing Users Not On List' to archive any students, student leaders or teachers who do not appear in the list you are uploading.
- Click Import List

.gif?width=688&height=361&name=2024-08-27_15-57-39%20(1).gif)
Errors
If there is an error in your data, Minga will flag that in your Upload Summary (see the video below).
- Click 'download' next to ERRORS to view a spreadsheet notifying you about the errors in the data.
-gif.gif?width=688&height=346&name=2024-08-27_16-05-33%20(1)-gif.gif)
In this example, the downloaded file shows the error 'Creating a new user requires an email address'.
This is because this student number had a typo and was not recognized as an existing user so Minga believes we are trying to add a new user.
You can now go into the data, correct the error and try again.
